I've been playing paintball using modified Brass-Eagle
Stingray for 4 years , and it never let me down , Stingray proved an
extreme reliable tool for painting my friends .I recently changed to a
Rainmaker (will be heavy modified too) and that's why I updated this
page one last (?) time.
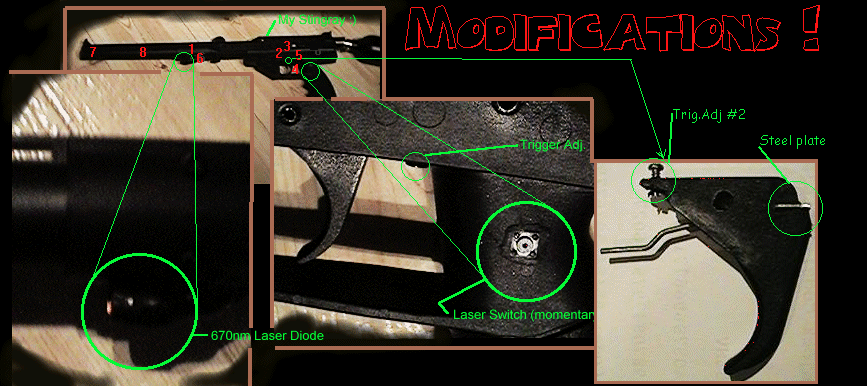
Modifications DONE :
- Laser sight : The
paintball and beam meets 20 meters from muzzle. The momentary switch
are located on the grip (thumb-operated) the battery (9V) are in the
grip.
- Trigger Adj #2 : Prevents the Trigger from returning more than
necessary (few 2-3mm) to catch the sear.
- Trigger Adj #1 : Makes the trigger be as close to "trigged"
position as possible by lifting the sear.
- Steel Plate where the trigger lifts the sear.. Increases accuracy
of trigger.
- The hammer-tube and hammer (aluminum) is polished , the hammer's
O-rings reduced for smoother action.
- The barrel shroud have fine tape attached to it , more accuracy ,
no barrel movement.
- A piece of barrel shroud (1 inch) is removed to reduce turbulence
when the ball exits the barrel. (no picture) (gave no significant
improvement)
- The barrel (aluminum) is polished and always lubricated with
Teflon-oil
- All Stingray's moving parts are frequently
lubricated using Teflon-oil
TO DO :
-
Drill muzzle-break in barrel.
-
Buy a good aftermarket barrel / modify another
standard barrel.
-
Join the two pins that holds the barrel in-place ,
That will allow really quick barrel-change , no other marker I know can
change barrels (in case of ball brake) quicker in game.

STINGRAY FAQ
& FAQ SUPPLEMENTARY
(ripped from
misc stingray sites/boards and/or any other source)
- 1.0 INTRO
- 1.1 TABLE O' CONTENTS
- 1.2 INTRODUCTION
- 1.3 GENERAL INFORMATION
- 1.4 PROS & CONS
- 1.5 HOW IT WORKS
- 1.6 SID'S NOT-SO-HUMBLE
OPINION
- 1.7 MORAL OF THE STORY
- 2.0 GENERAL
DISASSEMBLY/CLEANING/REASSEMBLY
- 2.1 STEP ONE - TAKE IT OUT
TO PLAY
- 2.2 STEP TWO - TOOLS YOU
NEED
- 2.3 STEP THREE - GENERAL
DISASSEMBLY/CLEANING/REASSEMBLY
- 2.4 STEP FOUR - VALVE
DISASSEMBLY/CLEANING/REASSEMBLY
- 3.0 IMPROVEMENTS AND MODS
(STUFF YOU CAN'T LIVE WITHOUT)
- 3.1 IMPROVE RANGE AND
VELOCITY VALVE MOD
- 3.2 IMPROVE RANGE AND
VELOCITY HAMMER TUBE MOD
- 3.3 IMPROVE ACCURACY BARREL
MOD
- 3.4 IMPROVED TRIGGER PULL
AND FIRING RATE MOD
- 4.0 AFTERMARKET PARTS
- 4.1 SID'S NOT-SO-HUMBLE
OPINION II
- 4.2 A DECENT PAINT HOPPER
- 4.3 VENTURI BOLT
- 4.4 BOTTOM-LINE KIT
- 4.5 AFTERMARKET BARRELS
- 4.6 SIGHTS & SCOPES
- 4.7 FIELD STRIP PINS
- 4.8 OTHERS
- 5.0 MISCELLANEOUS TIPS &
INFO
- 5.1 ADDING A FORE-GRIP
- 5.2 TACTICAL SLING
- 5.3 CAMO STINGRAY
- 5.4 ALIEN ENGINEERED PLASTIC
- 6.0 CLOSINGS, ACKNOWLEGMENTS
WARNING
I am not responsible for
anything you screw up. If you don't think something sounds right e-mail
me, and I'll clarify.
All of the methods presented have already been tried out and work well
unless otherwise noted.
Whatever you do you do at you own risk. So there.
- 1.2 INTRODUCTION:
This FAQ is intended for people using or wishing to buy the Brass
Eagle/Daisy Stingray.
The Stingray is the Tinker's paintgun. The parts are extremely cheap
(Barrel - $3.50), the materials can be worked with
ordinary tools most humans keep in their house, and the design is
simple yet effective. The Stingray is also great for
a beginner because of its low price, yet with some simple
do-it-yourself mods you can kick some *ss all the way up
to tourney level (despite what the 'Cocker-Suckers and
Automaggots have to say :-). This FAQ contains information
on the marker, how to maintain it, how to modify it, and some
other useful stuff. Enjoy, enjoy!!!
1.3 GENERAL INFORMATION:
- Name: Stingray
Manufacturer: Daisy/Brass Eagle
Manufacturer's Address: BRASS EAGLE
P.O. BOX 220
RODGERS, ARKANSAS 72757
Manufacturer's Phone# : (800) 643-3458
Calibre: .68
Action: Semi-Automatic, Blowback open-bolt design
Price: NEW $85-$100 USED $50+
Materials used: Aluminum, Steel, and some Black-Colored, Alien
Engineered, plastic-like substance (explained later)
- 1.4 PROS & CONS
- Low Price
- Easy Takedown
- Simple Design (easy to
troubleshoot & modify)
- Good Gas Efficiency
- Extremely light and
well-balanced (easy one handed operation)
- Finish DOES NOT rust,
nick or dent.
- LOW Ball-Breakage
- Cheap replacement parts
- Very happy on a diet of
liquid or gas
- Not very picky on brands
of paint
- CONS:
-
- LONG, CREAKY Trigger
pull (*)
- Relatively Slow rate of
fire (*)
- Comes with a dinky
little paint hopper (*)
- CO2 tank is in a bad
position, makes it hard to use sights (*)
- (*) = easily remedied
with some simple mods
- Relatively loud when
fired
- (Read the
"Supplementary" that follows this DOC.)
1.5 HOW IT WORKS:
Here's a general run-down of how the 'Ray functions: The CO2 is
sent through the Donkey, through the Transfer Tube
to the Valve Body where it waits to be released. The Cocking Screw is
pulled back and the Sear catches on the Hammer.
The Hammer is pushed forward a bit by the pressure of the Hammer Spring
which allows the Trigger to manipulate the Sear.
When the Trigger is pulled, the Sear is disengaged from the Hammer and
the Hammer slides forward to push in the Valve Stem.
While the Hammer is sliding forward, it also slides the Bolt and a
paintball forward into the barrel. When the Hammer pushes
in the Valve Stem CO2 is blasted out the front to fire the
paintball and blasted out the back to cycle the action. The Hammer is
blown back, smashes against the Hammer Bumper and catches on the
sear, ready to fire again.
1.6 SID'S NOT-SO-HUMBLE OPINION:
I've had a Stingray for a while now, I've put a few mods on it and made
most myself. I still go to the field for Open Play and listen
to the Auto-Maggots and 'Cocker-Suckers blather about how many
gajillions of dollars they sunk into their markers. I still get "The
Look"
(a very common look of puzzlement and condescension), and these
mutants chuckle at having a 'Ray at their field. OF COURSE the 'Ray
is inferior, it only rings in at around $90.00. "There is just
NO WAY that a marker which costs so little can defeat me and my
Joey-Driscoll-Signature-Series-Super-Bloat-Blaster-XV9600!(tm)",
they say. Oddly after the game, many of these people -now wearing a
plethora
of non-toxic flavors, give "The Other Look" (fear and disbelief).
1.7 MORAL OF THE STORY:
Judging a player by the price tag of his marker will only earn you a
lot of time in the Deadzone.
2.0 GENERAL
DISASSEMBLY/CLEANING/REASSEMBLY
- 2.1 STEP ONE -TAKE IT OUT
TO PLAY:Congrats! You are the proud owner of a Brass Eagle/Daisy
Stingray Semi-Auto .68cal. Paintball marker. "What do I do with it
now?" you ask.
The Stingray is ready to go out of the box so.... Go out and play, man!
And I mean *PLAY*, not shoot a target - You know, running though the
woods with those .68cal. critters hot on your heels. This will give you
an idea of what you need to keep and what to change. Note the
lightness, how well it points, and how easy it is to maneuver with it.
Now go back home.
2.2 STEP TWO -TOOLS YOU NEED:
It's time to assemble your small minion of tools. This is a complete
list -you can improvise for some of the tools. You need:
- 4mm Hex Key (incredibly
useful)
- Hammer (aka force-it
wrench)
- Automagic Transmission
Fluid for cars (I use Dextron III - Mercon)
- Dremel Moto-Tool (I
could write tomes about it, trust me you NEED one!)
- Flat-head Screwdriver
- X-Acto Knife
- Teflon Tape
- Some Shop Rags
- Hack Saw
- Old Toothbrush (A
friend's or sibling's may also be substituted)
- Emory Cloth (Coarse,
Medium and Fine for metals)
- No. 7 Rubbing Compound
or the similar
- Cheap Safety Goggles
(NOT your $60.00+ dollar paintball goggles, these are for while you are
polishing metal, not playing paintball)
- Flexi Hone Finishing
Brush or a wooden dowel
- Plasti-Zap (Super Glue
works well also)
- 2 Ton Epoxy
- Electric Drill and bit
set
- LockTite Threadlock (The
Blue Flavor)
- 2.3 STEP THREE -GENERAL
DISASSEMBLY/CLEANING/REASSEMBLY:
- Make sure you don't have
any paintballs or CO2 in the 'Ray (Duh!) or you'll have BIG problems.
- There are two pins at
the back end of the Barrel pull them out and remove the Barrel and
Barrel Shroud. NOTE: If you encounter difficulty removing the pins push
them out a bit with your trusty 4mm hex key. Then, give the hex key a
whack with Mr. Hammer -viola it's out, man.
- Pop the two pins which
hold the bottom part (Grip Assembly) to the top part (Receiver) and
separate the two parts.
- Put the Grip assembly
somewhere safe and remove the Cocking Screw
- Locate the Top Frame Pin
near the Velocity Adjustment Screw on the Receiver and remove it.
- Slide the guts (Valve
and Tube Assembly) out of the rear of the Receiver. If it appears to be
stuck, use the 4mm Hex key to tighten the Velocity Adjustment Screw and
try it again.
- Put the Receiver
somewhere safe and push out the two Donkey Pins located at the rear of
the Valve&Tube Assembly (The Hex key/Hammer trick works great for
this).
- Pull the Donkey (What a
very descriptive name -NOT!) out of the back of the Hammer Tube, the
Transfer Tube should come with it. If it doesn't remove that also.
- Lift the arm of the Bolt
Transfer Link Assembly out of the groove in the Hammer and slide it off
of the Bolt Guide.
- Remove the small, metal,
roll pin (Valve Pin) from the lower front of the Valve & Tube
Assembly.
- Slide the Valve Assembly
out of the front of the Hammer Tube and clean it (See .4).
- Slide the Hammer, the
Hammer Spring, Hammer Bumper, and Hammer Bumper Spring Guide out of the
Hammer Tube.
- Stare at the Big Pile O'
Parts and smile triumphantly. Proceed to wipe off any dirty, greasy
parts with the shop rag. All parts can be placed under running water to
be easily cleaned.
- Use a copious amount of
AFT Fluid on all the O'rings, the Hammer, the Bolt Guide, and the
inside of the Hammer Tube.
- Follow steps in reverse
order for reassemble except do not replace barrel.
- Hold marker with the
business end down and fill the donkey with ATF Fluid. Push the Cocking
Screw FORWARD and some ATF Fluid will seep in. Install CO2 (NO
PAINTBALLS) and fire 20-30 times.
- 2.4 VALVE
DISASSEMBLY/CLEANING/REASSEMBLE:
- Remove the Valve Seal
Retainer with a screwdriver. The parts are under pressure from the
Valve Spring and will reward you with a maelstrom of little flying
pieces if you're not careful.
- Remove the Valve Seal,
Valve Stem, Valve Spring (they should fall out), Valve O'ring, and
Valve Washer (these may require some coaxing)
- Remove the Velocity
Adjustment Screw and Velocity Spring with the 4mm Hex key
- Remove all the grease
and crap from the Valve Body with the shop rag, and wipe off all the
other parts.
- Use a copious amount of
ATF Fluid when reassembling. Make sure you seat Valve O'ring well and
the Valve Washer has the bevel facing down. If you neglect to do any of
this it *WILL* leak. Leftover parts is NOT a good thing. Follow the
steps in reverse order to reassemble.
- Hold the Valve Assembly
upside-down and pour some ATF Fluid into the Transfer Tube hole and
down the side the Valve Stem. Now push the Valve Stem in several times.
This will work more ATF Fluid into the Valve Assembly, assuring a good
seal.
3.0 IMPROVEMENTS AND MODS
(STUFF YOU CAN'T LIVE WITHOUT)
3.1 IMPROVE
RANGE AND VELOCITY VALVE MOD:
- Remove and disassemble the
Valve Body
- Place some Fine Grit Emory
Cloth on a hard, flat surface and sand down the outside face of the
Valve Seal Retainer -This will allow the Hammer to push the Valve Stem
farther. DO NOT sand it down so far that you don't have anything left
for the screwdriver to catch on (Duh!).
- Take the Valve Stem and
polish it with the Dremel Moto-tool's felt polishing tool (can be done
by hand, but is Very tedious) and the No. 7 Rubbing Compound (or
similar). The Valve pin should appear chromed, and very, VERY smooth.
This will allow the pin to move with less force.
- Polish the Bolt Guide tube
to a chrome-like finish. This will allow the Bolt to glide smoothly and
efficiently.
- Remove the Velocity
Adjustment Screw and place a small piece of Teflon Tape on the threads
(this prevents ANY escape of CO2).
- Enlarge the Velocity
Adjustment Screw hole in the Receiver with an Electric Drill and the
X-Acto Knife. Be sure to remove the plastic shavings from the inside of
the Receiver. This will allow you to unscrew the Velocity Adjustment
Screw farther.
- Reassemble with lots of ATF
Fluid (Make sure every last trace of the Rubbing Compound is GONE or
there will be problems).
- 3.2 IMPROVE RANGE AND
VELOCITY HAMMER TUBE MOD
- 3.2.1 Remove all pieces from
Hammer tube and polish the inside of the Hammer tube with Flexi-Hone
Finishing Brush. The Brush can be substituted with a 5/16" wooden dowel
with a shop rag taped to the end and some No. 7 Rubbing Compound (or
Similar) used as a polishing agent.
3.2.2 Remove the O'Ring from the Hammer and use the Dremel Moto-Tool's
Felt Polishing Tool (Hand polishing is possible, but tedious) and some
No 7. Rubbing Compound (or similar) to polish the Hammer to a
chrome-like finish. This will allow the Hammer to glide inside the
polished Hammer Tube, greatly increasing the efficiency.
3.2.3 Placing washers between the Hammer Bumper and the Hammer Spring
Guide will put more pressure on the Hammer Spring and will increase
velocity. Be careful with this though, as too much pressure will keep
your Stingray from being able to re-cock itself.
3.2.4 Reassemble with lots of ATF Fluid thnly coating each part(Make
sure every last trace of the Rubbing Compound is GONE or there will be
problems).
- 3.3 IMPROVE ACCURACY BARREL
MOD
- 3.3.1 Remove Barrel and
Barrel Shroud Hammer tube with Flexi-Hone Finishing Brush.
3.3.2 Polish the inside of the Barrel with the Flexi-Hone Finishing
Brush The Brush can be substituted with a 5/16" wooden dowel with a
Shop Rag taped to the end and some No. 7 Rubbing Compound (or Similar)
used as a polishing agent. This will increase accuracy by smoothing the
Barrel. If No.7
Rubbing Compund is not available, diatom based toothpaste (like Crest
or Colgate) will actually work here, plus it will leave your barrel
smelling minty fresh.
3.3.3 Use the Hack Saw to make two cuts on the Barrel Shroud and remove
about 1 1/2" from the middle of the Barrel Shroud.
3.3.4 Sand out or drill the front opening of the Barrel Shroud so the
Barrel may pass through.
3.3.5 Glue the two pieces of the barrel shroud back together with the
Plasti-Zap to hold them together until you get it aligned. Then use the
2 Ton Epoxy.
3.3.6 When you reassemble the 'Ray, a good chunk of the Barrel should
stick out past the Barrel Shroud. You can polish the tip to a chrome
finish for a custom look. The piece of plastic which once existed in
front of the barrel acted like an "Anti-Muzzle Break".
You should now see a marked improvement in accuracy. The shortened
barrel shroud will also allow you to attatch aftermarket muzzle brakes,
or to drill in integral muzzle brake into the end of the barrel
(replacement barrels are very inexpensive, so it doesn't hurt to
experiment).
- 3.4 IMPROVED TRIGGER PULL
AND FIRING RATE MOD
- 3.4.1 Remove the Grip
Assembly from the Receiver.
3.4.2 Remove the Sear Pivot Pin (the Hex key/Hammer trick should work).
3.4.3 Remove the Sear. Be careful, it's also attached to the Sear
Spring.
3.4.4 Sand the sides of the sear with Fine Grit Emory Cloth and polish
with the No. 7 Rubbing Compound. Also polish the inside of the oval
shaped hole in the Sear (A Dremel Moto-Tool helps)
3.4.5 INSTALL THE SET SCREW: Drill a 3/8" hole in the Bottom Rear of
the Trigger Guard to allow access for a Drill and Screwdriver.
3.4.6 Drill a 1/8" hole in the Grip Frame and through the Sear Plate.
Use the hole you drilled in the Trigger Guard for easy access. Drill
the hole near the grip.
- NOTE: Older Stingrays have a
Sear plate made of Aluminum -cake to drill through. Newer models use
some sort of Titanium/Kryptonite/Alien- Engineered metal. Be prepared
to use excessive force!!! The newest models make a lame attempt at
fixing the trigger pull by putting a "bump" in the Sear Plate -you
still need to drill and install the set screw.
3.4.7 Screw a 5/32"dia. 1/4"(or thereabouts) machine screw into the
hole. The screw will tap itself unless it's one of the newer, harder
sear plates -then you'll have to widen the hole a bit.
3.4.8 Install the Sear and Sear Pivot Pin and reassemble the 'Ray.
3.4.9 Try to cock the 'Ray. If it won't catch, unscrew the set screw
until it will. There will be a lot of play in the trigger -we'll take
care of that in a few, just pull the trigger back until you feel
resistance. When you feel resistance, squeeze until it fires. Adjusting
the screw will shorten\lengthen this distance -you can achieve a
hair-trigger in this manner.
3.4.10 ADJUSTING THE PLAY: With the Grip Assembly removed from the
Receiver push the Sear forward. Pull the Trigger back until it makes
contact with the Sear. Note the trigger position.
3.4.11 We're going to put a screw through the Grip assembly, over the
arm on the front of the trigger. This will limit the distance the
trigger can move forward, giving a short,crisp trigger pull.
3.4.12 Drill a 5/16" hole on either side of the grip assembly for the
play screw. These holes should allow for the screw to hold the tigger
arm down a bit. A good guideline is to drill out the "E" in "PUSH SAFE"
on one side and the "P" in "PUSH FIRE" on the other.
3.4.13 Test fit the screw and sand or build up the trigger arm until
the amount of play is to your liking.
3.4.14 Put an appropriate nut on your bolt (a lockwasher is also a good
idea) and tighten. Reassemble the marker and test fire. Make minor
adjustments until satisfied.
4.0 AFTERMARKET PARTS
- 4.1 SID'S NOT-SO-HUMBLE
OPINION II:
After you have completed the simple do-it-yourself mods outlined in
Part 3 you have yourself quite a formidable marker:
- It will fire more rounds
per second than a VM-68
- It is quieter than the
VM-68
- It's weight is second
only to the Tippman Pro-Lite and some Stock Markers
- You can easily squeeze
out range and velocity far beyond an out-of-the box Automag
- The trigger is a whole
lot better than an out-of-the box Auto-Cocker
- It's as durable and
reliable as the Tippman Pro-Lite
- Accuracy is outstanding
- It eats liquid or gas
-it doesn't care
- You've probably spent
less than $100
- Now you should have a few
bucks for some aftermarket parts. They will improve your marker even
more.
- 4.2 A DECENT PAINT HOPPER:
The Paint Hopper which comes with the 'Ray will be the first thing you
want to replace (Mark my words).
This dinky little hopper holds about 70 balls and has a SCREW ON
CAP which is OPAQUE BLACK. The mouth opening is large enough to put one
ball in at a time -making bulk loaders useless. My Opinion: Splurge the
$9.00 to $15.00 bucks to get a 200rd. hopper it is *really* worth it.
I'm rather fond of The VL-200
(not VL-2000 - the action of the marker agitates the hopper quite well
and makes it unnecessary).
4.3 VENTURI BOLT:
The bolt which comes with your Stingray is abysmal compared to a good
aftermarket bolt. The Ventuti Bolt is designed to push the paintball
with many streams of air producing equal pressure on the back of the
paintball vs. one centered blast. A Venturi Bolt will make a noticeable
increase in range and accuracy. It will even reduce ball breakage.
Venturi bolts fo the 'Ray will range between $15.00 to $25.00 and are
well worth it.
Note: While Bill thinks they certainly can't hurt he questions the
claim that venturi bolts will increase accuracy.
4.4 BOTTOM-LINE KIT:
The CO2 tank tends to get in way of aiming in it's stock position. With
a bottom-line kit you can aim more comfortably and the tank will make a
much better shoulder stock. Many bottom-line can be mounted backwards
so the tank will face forwards and will be parallel to the barrel.
This makes the marker a bit front-heavy but awesome for flag-running
-especially in heavy brush.
Look for bottom-line kits for $40.00 - $60.00
4.5 AFTERMARKET BARRELS:
Many different brands. I've had experience with the Smart Parts
Stingray barrel -the pin grooves were too deep and I ruined a bolt. I
am ordering a Bud Orr Stingray barrel and hoping for better results.
My Opinion: Experiment with Stock Barrels -Cut them, port them, put a
suppressor on them, put a muzzle break on them. Heck, they cost $3.50 a
piece, as does the Barrel Shroud. Experiment! Besides, with the shroud
cut back, the stock barrel is very accurate.
4.6 SIGHTS AND SCOPES:
The Stingray has an integral dovetail base and almost any paintball
marker, BB gun, or .22 scope will fit nicely. Prices and types vary
widely.
4.7 FIELD STRIP PINS:
Replaces the pins which hold the 'Ray together. Includes a ring at one
end for EASY removal. Much better than those hard to remove stock pins,
but not a really necessary mod.
These ring in at $8.00 - $11.00
4.8 OTHERS:
There are a few others wich may reap some benefit, but I've covered
most of the major ones. There is also a Commando kit which looks cool,
but seems kind'a pricey ($85.00). I haven't used the Commando kit, but
if someone has please send some info and we'll include it.
Also, if re-working the trigger seems like a big job to tackle
yourself, trigger assemblies with sear set-screws already installed are
available from I&I Sports Supply.
5.0 MISCELLANEOUS TIPS &
INFO:
- 5.1 ADDING A FORE-GRIP:
I've added a home-brew foregrip to my 'Ray, it works very well and
looks good. Try it out:
5.1.1 Get some Plasti-Zap
(or Super Glue), 2 Ton Epoxy, and a 6" length of 3/4"ID PVC pipe.
5.1.2 Bevel the bottom end of the PVC pipe to take off the edges.
5.1.3 Wrap a piece of sandpaper around a 1 1/2" dowel and sand a
"saddle" into the top of the pipe.
5.1.4 Test fit the fore-grip right behind the barrel pins -sand as
necessary
- 5.1.5 Spray paint flat black
and allow to dry.
5.1.6 Use the Plasti-Zap (Super Glue) to hold the grip in place whule
you apply the 2 Ton Epoxy
5.1.7 Allow the Epoxy to dry and 'Viola - Elliot Ness-like fore-grip
- 5.2 TACTICAL SLING:< A
ver nice addition to any Stingray. Makes it much easier to carry, yet
doesn't interfere with moving or firing. The sling itself can be made
of any material of your liking. the clip mounts are best mounted:
- Key rings work well to
attach the sling to the marker. You may also find some sort of clip at
a local hardware store.
5.3 CAMO STINGRAY:
The Odd, Black, Alien Engineered Plastic takes to spray paint extremely
well. And at $12.50 to replace ALL
of the Matte-black Plastic-like material, if you REALLY screw up
it isn't much to replace it all. Using a coarse sandpaper to "rough up"
the plastic helps the paint to adhere to it, and finishing off
with a few coats of clear Urathane will provide a tough finish that
resists chipping. Grey primer in a Camo pattern works well,
as does green. I've also seen 'Rays painted with the Formby's New
Marble and Stone Spray paint. It's an easy way to customize your marker.
5.4 ALIEN ENGINEERED PLASTIC:
A final word on the strange Alien Engineered Plastic they use for the
Stingray. I've heard 'Cocker Suckers and Automaggots blather about how
they think a Stingray
would break or wear out easily. Wrong again! It's a hard plastic,
yet it doesnt crack. When Brass Eagle first unveiled the Stingray,
Randy Kamiya (then editor of Action Pursuit Games, now editor of
Paintball Industry) put one through
a torture test of running it over with a car, and shooting the
reciver with a .22 handgun. It still worked! It doesn't cut like most
plastics, it's extremely rigid, and it doesn't scratch easily. I have
NEVER seen any of the plastic parts break.
It's really incredible. It appears to be of the same family as
the plastic on the Splatmaster, but a little better. Wierd stuff, but
good.
6.0 CLOSINGS, ACKNOWLEGEMENTS
- I hope this FAQ has helped
you, in exchange for the information presented here (and you thought
you got it for free) I request one of three things while you are on the
field:
- 1. Mark a known "Newbie
Hunter" with your Stingray
- 2. Mark one of those
Automag biggots (Automaggots) or one of those poor suckers who feels
the need to pour money into after-market parts for their Auto-Cockers
('Cocker-Suckers)
- 3. Use a Stingray in a
Tourney
- There is some education to
be passed out here, and non-toxic colors open the doors of
communication. :-) When you complete one of these tasks, E-mail me and
tell me about your adventure and I'll list you amoung the paintball
deities. Thanx.
I could not have written this myself, Bill Mills has been an incredible
help. His knowlege of paintball is only matched by how personable his
disposition is. If you have any questions feel free to E-mail him also.
Lastly, to all my fellow Outlaw and Wild Cat paintballers out there -
wear your goggles and chrono those markers.
Have fun,
STINGRAY FAQ
SUPPLEMENTARY
- 1.1 INTRO
- 1.1 TABLE O' CONTENTS
- 1.2 INTRODUCTION/WHY
ANOTHER?
- 1.3 GENERAL INFORMATION
- 1.4 SID'S NOT-SO-HUMBLE
OPINION
- 1.5 THE DREADED DISCLAIMER
-
- 2.0 SILENCING THE STINGRAY
- 2.1 EXPLANATION
- 2.2 REDUCING MUZZLE NOISE BY
PORTING I
- 2.3 REDUCING MUZZLE NOISE BY
PORTING II
- 2.4 REDUCING MUZZLE NOISE
WITH A SOUND SUPPRESSOR
- 2.5 REDUCING MECHANICAL
NOISE AT THE COCKING SLIDE
- 2.6 STOPPING THE TANK FROM
RINGING
- 2.7 STOPPING MECHANICAL
NOISE FROM THE GRIP
-
- 3.0 BARREL SHROUDS &
ACCURACY
- 3.1 EXPLANATION
- 3.2 THE ORIGINAL METHOD
- 3.3 METHOD II
- 3.4 METHOD III
- 3.5 AFTERMARKET BARREL
SHROUD
- 3.6 IMPROVING STOCK BARREL
CONSISTENCY
- 3.7 AFTERMARKET BARRELS
-
- 4.0 MISCELLANEOUS
- 4.1 BLUEING THE HAMMER
- 4.2 LUBRICANT
- 4.3 BOLT DAMAGE
-
- 5.0 CLOSINGS
1.2 INTRODUCTION/WHY ANOTHER?:
Since the first STINGRAY FAQ, I have received an enormous response by
players who have tricked out their Stingrays and are enjoying the
exceptional performance gained from a little shade-tree
airsmithing.
Not only that, but many players have taken the information contained in
the FAQ and have taken it a step further.
This FAQ contains the information to do just that - To take the
Stingray a step further.
1.3 GENERAL INFORMATION:
  Name:          Stingray
  Manufacturer:  Daisy/Brass Eagle
  Manufacturer's Address:  BRASS EAGLE
                           P.O. BOX 220
                           RODGERS, ARKANSAS 72757
  Manufacturer's phone#    (800) 643-3458
  Calibre:       .68
  Action:        Semi-Automatic, Blowback Open-bolt design
  Price:         NEW $85-$100  USED $50+
  Length:        23" (unmodified)
  Barrel Length: 12" (unmodified)
  Weight:        3.6lbs. (unmodified)
  Materials used: Aluminum, Steel, and some Black-Colored, Alien
                  Engineered, plastic-like substance
1.4 SID'S NOT-SO-HUMBLE OPINION:
The 'Ray is here to stay! There is no doubt in my mind that this is the
paintgun for the tinker-freak. I have spoken with some 'Cocker Suckers
and Auto-Maggots at the field who spout,
"When you buy any other marker, they all look the same. Cookie-cutter
paintguns. But when you buy a
Joey-Driscoll-Signature-Series-Super-Bloat-BlasterXV9600(tm), you can
upgrade in so
many different ways! That's a custom paintgun." I tend not not to
agree. How are they so custom? I bought a Laso(tm) Barrel and he bought
a Bart Parts(tm)!?!
After the FAQ was published, it
seemed the Glenn Palmer in all of us emerged and I began to see some
*CUSTOM* designs on the field. Great ideas were hatched, ingenuity was
the rule.
I began receiving E-mail from players who had done things I truly never
imagined. They are TRULY producing custom markers -and they have enough
ca$hola left over for paintballs and a pizza (or, well... more
paintballs!)!
This FAQ is dedicated to those players - They are the ones who help
keep the sport original and fun.
1.5 THE DREADED DISCLAIMER:
Once again I wash my hands of all your actions. Know that I refuse to
take responsibility for your doings. Heck, I don't like to take
responsibility for half the stuff I do. Always remember, CO2 and
especially Nitrogen or
Compressed Air is DANGEROUS if misused/treated carelessly. Be careful,
use safety equipment and ALWAYS DISCONNECT THE GAS FROM THE PAINTGUN
BEFORE YOU ATTEMPT TO TINKER.
If anything seems unclear, I'll be more than happy to clarify or answer
any questions. If you would like to sue me for damages, I never wrote
this. ;-)
2.0 SILENCING THE STINGRAY
2.1 EXPLANATION:
Stealth is a very handy option when playing paintball. Sneak in, sneak
out with the flag - without giving up your location. Unfortunately,
this wasn't much of an option with the Stingray.
While not as loud as a Stock Spyder (CRRRACK!), it will let any nearby
opponents know where you are... until now... This section is almost
completely the work of Tom Holder.
He has completed these mods and tested them with a sound meter (gotta
be scientific). A dramatic decrease in sound was noted. He concentrated
on two areas -Muzzle Blast, and Mechanical Noise.
2.2 REDUCING MUZZLE NOISE BY
PORTING I:
NOTE: This only works when the
barrel shroud is cut back.
- 2.2.1 Start with a stock
barrel, you will also need a drill (a drill press is optimal) and
something to hold the barrel in place.
2.2.2 Insert a wooden dowel inside the barrel to prevent deforming.
Make sure you use plenty of oil while drilling.
2.2.3 Drill 8 rows of holes with a 1/16" drill bit, space the holes
approximately 1/4" apart for the last 3" of the barrel.
2.2.4 Using progressively finer grits of sandpaper, sand the burrs out
of the inside of the barrel.
2.2.5 Polish the inside of the barrel with a Flexi-Hone Finishing
Brush. This can be substituted with a Dremel Moto-Tool with a polishing
head,
or a drill with a wooden dowel and shop rag. If you use the Dremel or
the Drill, you must use some sort of polishing compound (look for it in
the auto-parts stores).
2.2.6 Wash the Barrel thoroughly with warm water
2.2.7 Push a wadded up piece of Tissue through the barrel with a wooden
dowel to remove any remnants of the sanding/polishing.
2.3 REDUCING MUZZLE NOISE BY
PORTING II:
NOTE: This only works when the
barrel shroud is cut back.
- 2.3.1 Start with a stock
barrel, you will also need a Dremel Moto-tool with a cut-off wheel
attachment.
2.3.2 Measure 1/4" and 3/4" lines from the front of the barrel and draw
a ring around the barrel at these points.
2.3.3 Using the Dremel, cut 1/2" lines between the rings parallel to
the direction of the paintball's travel.
2.3.4 8-16 is optimal, make sure they are as evenly spaced as possible.
2.3.5 Using progressively finer grits of sandpaper, sand the burrs out
of the inside of the barrel.
2.3.6 Use an X-Acto knife or similar to make sure the slits are not
obstructed.
2.3.7 Polish the inside of the barrel with a Flexi-Hone Finishing
Brush. This can be substituted with a Dremel Moto-Tool with a polishing
head, or a drill with a
wooden dowel and shop rag. If you use the Dremel or the Drill, you must
use some sort of polishing compound (look for it in the auto-parts
stores).
2.3.7 Once again, clear the slits with the X-acto knife.
2.3.8 Wash the Barrel thoroughly with warm water.
2.3.8 Push a wadded up piece of Tissue through the barrel with a wooden
dowel to remove any remnants of the sanding/polishing.
2.4 REDUCING MUZZLE NOISE WITH
A SOUND SUPPRESSOR:
NOTE: The noise suppression
qualities are enhanced when used in conjunction with a ported barrel.
NOTE: Use of an unlicensed suppressor on a real firearm is illegal!
This suppressor is not for use on a firearm, it will not endure
the
stress of a muzzle blast. Contact the local BATF for any further
questions.
- 2.4.1 Get a plastic
Pepsi/Coke-a-Cola bottle, (My Mr.Pure .5litre water bottle works
great!) anything over 1litre is overkill. Try to get a bottle with a
mouth
slightly larger than the diameter of the barrel.
2.4.2 Cut a 2" hole in the bottom.
2.4.3 Measure 3/4" past the barrel porting and draw a ring.
2.4.4 Wrap tape around the ring until the bottle mouth will fit TIGHTLY
over it.
2.4.5 The bottle acts as a reservoir (diffuser) for the escaping
gasses. The quieting effect can be enhanced by covering the inside of
the bottle with felt
(use glue or buy the self- adhesive type at a Hobby store). and wrap
the outside in a small cloth/Camo Bandanna/etc.
2.5 REDUCING MECHANICAL NOISE
AT THE COCKING SLIDE:
NOTE: This reduces much of the
noise associated with Blow-back type semis.
- 2.5.1 Buy some
Styrofoam/insulation foam/a block of rubber. A 1 1/4" x 4 1/2" Block
will be more than enough.
2.5.2 Use an X-Acto knife or similar to carve the foam to conform with
the side of the Stingray (over the Cocking Lever).
2.5.3 Using the X-Acto or a Dremel Moto-tool, "rout" out a channel for
the cocking lever to slide in. You are creating a "cup" of sorts to
cover the Cocking lever slot.
2.5.4 Use self-adhesive Velcro or Rubber bands to affix the foam to the
side of the Stingray. Do not use anything permanent as you will have to
remove the cover to cock it.
2.5.5 Lastly, the foam usually comes in LOOK-AT-ME-WHITE, or
EASY-TARGET-BLUE. Paint the foam to match the Stingray.
2.6 STOPPING THE TANK FROM
RINGING:
- 2.6.1 Buy a Neoprene tank
cover.
2.6.2 Or use a remote.
2.6.3 Use a Bottom-line (sold at any paintball store), this also
relocates the tank to a better position for using the sights.
You can put the Bottom-Line on backwards to point the tank forward and
make the Stingray more compact.
2.6.4 All 3!
2.7 STOPPING MECHANICAL NOISE
FROM THE GRIP:
- 2.7.1 Look at your (hollow)
grip. It's a great shape for amplifying the mechanical noises of the
action.
2.7.2 Buy some expanding insulation foam from a hardware store (A $5.00
bottle will fill about 200 grips...).
2.7.3 Blast an inch or two into the grip to deaden the sound.
3.0 BARREL SHROUDS &
ACCURACY
3.1 EXPLANATION:
Since Bill "Bizboy" Mills' idea for cutting back the barrel shroud for
accuracy (the piece of plastic at the end of the barrel acts as an
"anti-muzzle break", and cutting back the shroud allows for porting to
work correctly) was published, the idea has been improved. I'm going to
use illustrations to make it as clear as I can.
3.2 THE ORIGINAL METHOD:
                                                            _
STOCK BARREL CONSISTENCY:
- 3.6.1 Shoot some paintballs
through the Stingray. Note if they curve.
3.6.2 If they curve, rotate the barrel until they no longer curve left,
right, or down. Curving up is desirable.
3.6.3 Mark the top of the tip of the barrel.
3.6.4 Remove the barrel from the Stingray.
3.6.5 With the mark facing up, place J.B. Weld or some similar
gap-filling epoxy in the sides of the gap used by the pins.
- Front View
___________________
|_____/_______\_____| <- Barrel Pin /X/ |X| |X|
<- "X"="J.B." Weld in the groove _________/X/___ |___________/_____|
<- Barrel Pin
- 3.6.6 Now, instead of having
a ring around the barrel, you have 2 grooves. The barrel will no longer
be able to rotate making for greater consistency.
- 3.7 AFTERMARKET BARRELS:
I haven't heard about any barrel with accuracy above and beyond the
stock barrel after a shroud mod and some polishing. I purchased the
Bud Orr Barrel and was disappointed - It was quite heavy and IT BROKE
EVERY OTHER BALL! It turned out, the breach end wasn't beveled
correctly. I've also heard of other aftermarket barrels causing the
Stingray to malfunction. If you run into this problem here is how
to fix it ala' Larry Shannon.
- 3.7.1 Remove the barrel and
clean it.
3.7.2 Measure from the breach (receiver) end, into the barrel 9/32" or
.281cm.
3.7.3 Mark a ring on the inside of the barrel.
3.7.4 Taper (bevel) the inside of the barrel to make it easier for the
bolt to move in using a Fine Round File or 180 grit emery paper.
3.7.5 After you get close to where you want it move to 240 grit, then
400 grit.
3.7.6 Polish the inside of the barrel with a Flexi-Hone Finishing
Brush. This can be substituted with a Dremel Moto-Tool with a polishing
head, or a drill with a wooden dowel and shop rag. If you use the
Dremel or the Drill, you must use some sort of polishing compound (look
for it in the auto-parts stores).
3.7.7 Wash the Barrel thoroughly with warm water.
3.7.8 Push a wadded up piece of Tissue through the barrel with a wooden
dowel to remove any remnants of the sanding/polishing.
This should decrease wear on the bolt O-ring and eliminate ball
breakage.
- 4.0
MISCELLANEOUS
- 4.1 BLUEING THE HAMMER:
I noticed after polishing the hammer to a glass-like finish (as
described
in the original FAQ), it became VERY susceptible to rust. Here is
how to remedy this.
- 4.1.1 Buy a Gun Blueing kit.
I *HIGHLY* suggest the Hoppes No.9 kit (found at sporting goods stores)
It's about $10 and contains everything you will need to blue a few
metric tons of steel.
4.1.2 Follow the instructions for the kit (DO NOT DRINK THIS STUFF).
4.1.3 Polish the newly blued hammer to a "Midnight Chrome" shine with
the provided steel wool.
4.1.4 It is just as smooth as before but now it's extremely rust
resistant.
- 4.2 LUBRICANT
While ATF Dextron3 is still the best thing I've found to use in the
valve, I have found a lubricant which when sprayed in the hammer tube,
causes the Stingray to cycle exceptionally smoothly. It is called
Tri-Flow. It contains Teflon and as I said, works extremely well -It
doesn't get thick in the cold, and it doesn't seem to eat O-rings.
4.3 BOLT DAMAGE
Many players have written concerning the "dings" which can be found on
the bottom of the bolt after using it for a day or 2. This is caused
by the bolt striking the Ball Detente' and DOES NOT affect the
performance of the bolt (stock or venturi) at all. You can prevent this
by removing the Ball Detente'. Your Bolt will stay shiny new, but the
Stingray will double feed and break many, many balls. I don't suggest
that.
- 5.0
CLOSINGS
- I hope these ideas will improve you play, spark
your imagination, or
lead to your greater enjoyment of the game. As always, if you have
any questions, ideas, or stories - just E-Mail them to me, I'm always
interested in the game.
I'd like to thank everyone who has donated their advise or ideas to make
this possible. Hopefully(?) I'll be writing the next version of this
in a few months.
- :-P
- As a parting shot, allow me
to leave you with my favorite story from
the field:
- I took my friend, Ken
Weston, out to the field on a warm Sunday afternoon for some Open
Play-type fun. As it was the first time he ever played, Jamie (my
infinitely better half) let Ken borrow her highly modified Sidray(tm).
He was doing exceptionally well for a newbie during the first few
games, and having much fun in the process.
Sometime in the middle of the day, another player with a 68AUTOMAG
sauntered up to Ken and began to tell him what a fine paintgun the
68AUTOMAG is. He patiently explained to Ken why the Stingray really
doesn't belong on the same field as his 68AUTOMAG. He believes it gives
him an almost unnatural advantage to tote around firepower like his
68AUTOMAG. He spoke especially of the lack of accuracy and range on the
Stingray's part. He then let loose a small salvo on a tree (most of
them hit) to quantify his statements. Ken (not one to be intimidated)
raised the mighty Sidray(tm) on high and proceeded to put a paintball
in each of the splotches left by the 68AUTOMAG. He turned his head and
said "What were you saying?" with a sincerely puzzled look. The man
with the 68AUTOMAG neglected to share any of his other theories with
Ken for the remainder of the day...
- Have fun.
FAQ's
are collected , converted & modified by me